In our previous installment, we mentioned how having access to tools can greatly expand an engineer’s ability to build. This article will walk through how to make tooling with a low-cost 3D printer. Printing fixtures, jigs, and molds can be an indirect way of using 3D printing to expand your toolbox. In part one we printed the molds; in this part we will print a part to make the mold with.
In the following examples taken from MakerBot, it took about 1.5 hours to create a mold from the 3D-printed part. Casting the mold only took 15 minutes. Working time will vary, but this will give you an idea of how quickly you could have a mold to start a manufacturing line in your own shop.
To start, you want to 3D print the part you want to make the mold for. It will also be important to have a container to hold the 3D printed part. This container could be made from foam core board, Tupperware, or even a cup, depending on its size. It is also possible to 3D print a container. The benefit of printing your own is that you can alter the volume to the precise size, plus you can add features to the box.
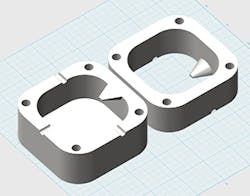
In this CAD model from MakerBot, the mold has a pour spout and three semi-circles along the edge on the container. Once the mold is assembled, these features will make holes to support small rods that will help hold the part in place while the mold medium is being poured and is setting.
There are resources online to find designs of parts: Thingiverse, YouMagine, Cubify, MyMiniFactory, GrabCAD, Shapeways, Autodesk 123D, and many more. If you can’t find what you would like to make, you can use free online CAD software to design it. Keep in mind when using a part for a molding process there are some basic design concepts you will want to keep in mind. These concepts are outlined in part one of this series.
Once you have your part and container, assuming they are able to hold water, fill the first part with water. This is just to get an idea of the volume in the first side of the container. Next, pour the water into a measuring cup. Then you can add the second part of the mold and repeat. Remember to subtract the volume of the first side of the container, so you have a rough idea of the volume of both sides of you container.
Remember Mold Release
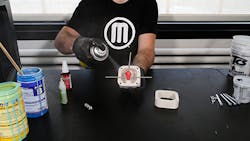
After drying the container and part, cover the surfaces of the container and part with mold release. Mold release isn’t expensive, and unless you want to wax the entire surface, the spray will save you time in setup and frustration in removing the part. Once covered with mold release, position the part on the pour spout and support it. Keep in mind where the part sits in the container and where the parting line is.
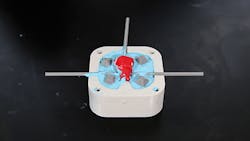
Notice the built-in features of the mold. The semi-circles let rods that can be superglued to the part to hold it in place. The cone at the bottom of the container will be the pour spout. If using another method to make your container, a funnel or something else should be put in this space to make a pour spout for the finished mold.
Now you can mix the material to fill the first side of the container. This is where knowing the volume of the first side of the container will come in handy, so you don’t mix more or less than you need. Make sure you know the pot-life of the material. For two-part mixes, do so slowly to prevent air bubbles, but not so slowly that is starts to set up before it has been poured. Now pour the mixed material slowly into the container.
Once poured, you can add keys or locator pins into the material. This will help the mold fit together properly. The gray blocks are the keys that have been pushed halfway into the side of the mold.
Once cured, remove any keys or locator pins, then spray the mold with mold release. Now add the second part of the container. Using the volume from just the second part of the container, mix your material for the next side of the mold, repeating the step you took for the first part of the mold.
After the material is set, remove it from the container. Remove the part, along with any supports or the pour spout. Make sure to fill any holes that these features have left to make the mold watertight—with the exception of the pour spout.
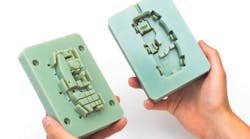
This is your mold from a 3D-printed part. Again, you can clamp both sides of the mold together and fill it with water so you have an idea of the volume and how much material to mix to fill the mold. Make sure to dry it and spray it with mold release before using it to mold a part. This will only be able to make so many parts. Be sure to check the parts that are generated with molds like this to ensure the quality and tolerance of your parts.


