Subjecting a metal part to the shot peening process induces a residual compressive stress in its surface. This compressive stress counters the effect of tensile stresses during operation of the part, thereby improving its resistance to fatigue failure.
This method of inducing residual stress increases the fatigue life of PT components, such as rolling-element bearings and shafts. It has long been applied to the root fillet area of gear teeth to improve their bending strength. But until 1982, it was not used on the tooth face. Then NASA initiated two series of tests that showed how shot peening extends the surface fatigue life of gears in the tooth contact area.
NASA tests — Part 1
In 1982, researchers at the NASA Lewis Research Center, Cleveland, Ohio, tested two groups of spur gears to determine the effect of shot peening on the surface fatigue pitting resistance in the tooth contact area. The gears were manufactured from a vacuum-melted (CVM) AISI 9310 steel. Both sets were carburized and case hardened to Rockwell C 58. The test gears had 28 teeth and a 3.5-in. pitch diameter.
On one group, researchers shotpeened the gear tooth surfaces, using a normal shot peening intensity (measure of energy imparted to the component) of 7 to 9A. The second group was not shot peened.
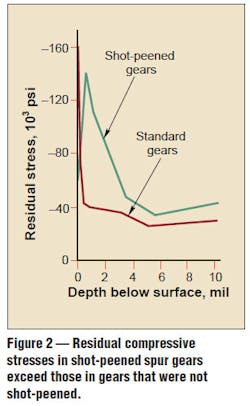
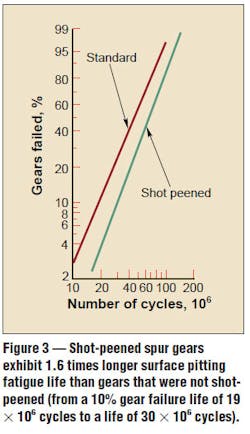
Residual compressive stresses in the shot-peened gears increased 40% over the standard gears at a depth of maximum shear stress (7 mil) for the load conditions, Figure 2. These compressive stresses improved the surface fatigue life, or pitting resistance, of the gears by 1.6 times compared to those that were not shot peened, Figure 3.
After these initial NASA tests, auto manufacturers began to use shot-peened gears in the gearboxes of cars and trucks. These gears are generally made from carburized chrome, nickel, or moly steels. Millions of these automotive gears were subsequently produced for both domestic and offshore use.
In 1991, NASA expanded on its earlier study by investigating the effect of shot peening gears to a higher-than-normal intensity. The new tests involved two sets of spur gears that were manufactured from vacuum-induction-melted, vacuumarc- remelted (VIM-VAR) AISI 9310 steel. The gears were case carburized, hardened to Rockwell C 60, and ground.
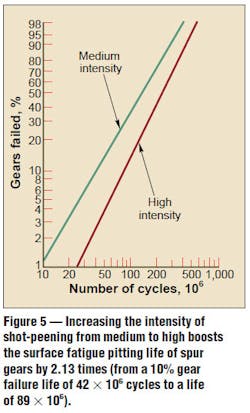
Researchers peened one set of gears to a medium intensity (7 to 9A) and the second set to high intensity (15 to 17A). Both sets were honed after peening to improve the surface finish to 16μ min. rms. As in the earlier tests, gears had 28 teeth and a 3.5-in. pitch diameter. Test conditions were the same as in 1982: 170 F, 10,000 rpm, and a maximum Hertz stress of 248,000 psi.
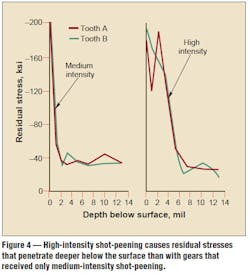
Residual compressive stresses for the high-intensity shot-peened gears were 57% higher than that for the medium-intensity shot-peened gears at a depth of 5 mil, Figure 4. This is the calculated depth of maximum shear stress when the effect of surface friction is considered. The compressive stress in the high-intensity shot-peened gears was also much higher at 1 to 6 mil below the surface.
As a result, the high-intensity shotpeened gears exhibited a surface fatigue (pitting) life 2.13 times that of the gears that were peened to medium intensity, Figure 5.
Other power-transmission applications
Manufacturers and researchers have also applied shot peening to gears made of special materials as well as to other PT components. Here are some examples. Austempered ductile iron (ADI). Shot peening increases the fatigue strength of ADI gear teeth, and it increases their hardness to achieve more wear resistance. Recent applications for ADI include crankshafts and camshafts, as well as gears.
Powder metallurgy. Peening has raised the endurance limit of some powder metallurgy (sintered) steel alloys by 22% and the fatigue life by a factor of 10. This suggests that highly stressed automotive components, such as gears and connecting rods, are good candidates for shot-peened sintered steel.
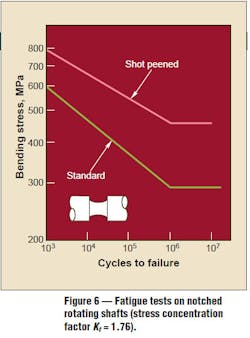
Shafts and axles. Many types of shafts and axles are shot peened to improve their fatigue properties, Figure 6. In some cases, peening is required only in keyways, splines, fillets, shear sections, or other section changes.
To protect driven equipment, many shafts have a shear section that fails when the shaft is overloaded. Because the shear section is thinner than the rest of the shaft, fatigue failures often start at this location. Shot peening the shear section increases shaft life, while retaining the overload protection.
Diaphragm couplings. Metal diaphragm couplings have recently been used in turbomachinery applications to accommodate misalignment through flexing. Shot peening significantly improves the flex fatigue life of these couplings.
The shot peening process prevents or delays metal fatigue cracking and stress corrosion cracking (SCC) of parts in the automotive, aerospace, chemical, petroleum, and power-generation industries. In this process, spherical shot made from cast, wrought, or stainless steel, as well as from ceramic or glass beads, are propelled against a part to cover the surface with cold-working dimples.
This dimpling induces residual compressive stresses in the surface. The compressive stresses eliminate detrimental residual tensile stresses caused by some manufacturing processes. In addition, when the part is subjected to tensile or bending loads, the compressive stress reduces the level of tensile stress in the surface where fatigue or SCC cracks are likely to occur. Shot peening is most effective in areas containing local stress raisers, such as notches, fillet radii, section changes, and surface defects.
Process controls. The effectiveness of shot peening depends on the magnitude, depth, and stress distribution of compressive stresses below the part surface. Companies that apply shot peening, such as the Metal Improvement Co. Inc., Paramus, N.J., can predicted these values from the part’s mechanical properties and the shot peening parameters, using either manual or computer calculations.
• Intensity indicates the amount of energy transferred from the shot stream into the part. It depends on shot size, shape, material, hardness, velocity, and impingement angle. Intensity is determined using an Almem gage to measure the curvature in a spring steel strip after it is exposed to the shot stream.
• Media (shot) should be spherical that can damage the part surface. It must be small enough to cold work the smallest radius of the part, and large enough to produce the required intensity. Shotclassifying devices segregate peening media by both size and shape.
• Peening dimples must completely cover the part surface in most applications. Inspectors traditionally use lowpower magnification (10X) to verify 100% coverage. In an alternate method, they examine the part under ultraviolet light to determine the amount of a liquid fluorescent dye that was removed during peening.
Computer enhancement. In recent years, control of the shot peening process has advanced with computer monitoring systems that control critical machine settings such as air pressure and shot flow at each nozzle, workpiece rotation or translation rate, nozzle reciprocating rate, nozzle-to-workpiece distance, and cycle time. At least once every second, the computer compares each processing parameter to preset limits. When a deviation is noted, it shuts down the peening operation and displays the fault. After corrective action is taken, the process is restarted.
Some manufacturing processes induce residual tensile stresses into parts, thereby lowering their fatigue strength. Such processes include through-hardening, grinding, abusive machining, plating, and welding. Nontraditional machining methods, such as electrodischarge machining (EDM) and electro-chemical machining (ECM) also shorten fatigue life.
For example, decarburization due to heat treatment reduces the fatigue strength of high strength steels (240,000 psi and up) by 70 to 80%, see figure, and lower strength steels (140,000 to 150,000 psi) by 45 to 55%. Shot peening restores most, if not all, of the fatigue strength lost due to decarburization.
For details on NASA Lewis gear fatigue tests, see 1982 NASA Technical Paper 2047, Effect of Shot Peening on Surface Fatigue Life of Carburized and Hardened AISI 9310 Spur Gears; and 1992 Technical Memorandum 105678, Improvement in Surface Fatigue Life of Hardened Gears by High-Intensity Shot Peening. For a copy of either paper, call Dennis Townsend at (216) 433-3955 or write to him at Mail Stop 77-10 — NASA LeRC, 21000 Brookpark Rd., Cleveland, OH 44135.
Related Articles: Bearing breakdown | Couplings and shafts
About the Author
Voice Your Opinion!
To join the conversation, and become an exclusive member of Machine Design, create an account today!

Leaders relevant to this article:

