Ask the Experts: 3D Printing Tips and Techniques
The following is the first in a series of tips and techniques to help answer your questions about 3D printing. If you would like to contribute tips, or have questions about 3D printing, email me at [email protected].
Chris Elsworthy CEO of Robox sent in the following Q&A on some basic questions about processing in a fused filament fabrication process. Elsworthy is a design engineer, and family man that started a product development company called Robox. Eventually he received funding from a United Kingdom based show called, “The Dragon’s Den,” Similar to the US’s, “Shark Tank.” Now Elsworthy and his team are building 3D printers, and have learned a few things about printing that is shared below.
What does the infill of a 3D printed object mean? How much do I need to use and how do I decide?
Elsworthy: Infill means how solid the model will be–in 3D printing terminology, this is known as “% Infill.” By selecting different levels of infill, users can decide how dense they want their print to be. Users who want their finished print to be very robust should choose a high level of infill, while users who want to print something quickly while also using up as little printing material as possible should choose a lower level.
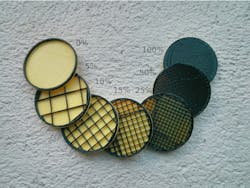
The infill is mainly for support and mechanical properties so the layer thickness or resolution is not as important. Depending on the software’s options, it is possible to increase the thickness of the fill while maintaining the same exterior layer resolution. This will reduce your print time without sacrificing any mechanical or aesthetic qualities. In general, infill is linearly proportional to strength.
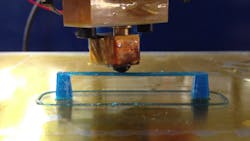
When do I need to print an object with brim?
Elsworthy: Brim is when a larger base layer is printed like a base flange that provides more surface area to be in contact with the bed. This can help the print to stick to the build surface and reduce warping. Brim should be enabled for prints when the “footprint(s)” of the model to the bed are very small in relation to the height. In these cases, by enabling brim, the footprint is made larger and sharp angles are reduced. Some models will require the brim feature to be switched on in order to print properly. This is up to the user to decide when this is necessary based on the model they have viewed (or the advice that came with the model). The requirement for brim is heavily dependent on geometry and the material being used to print—objects which are a “monolith” of plastic will exert higher warping forces on the base, particularly if printed with ABS or nylon, which have a high shrinkage rate as they cool. Brim increases the surface contact with the build tray, helping it stick and thus reducing warping and increasing the accuracy of the print.
Should I just always activate support material when I print? It’s hard to tell what needs it and what doesn’t.
Elsworthy: Support material should only be activated when there are overhangs over 45 deg. or where there is no material beneath a particular point on a model. Overhangs can be built up without support material, called “bridging,” making it difficult to get accurate, repeatable parts. If you control speed and resolution with accurate cooling (a cooling fan will be necessary), this can save time and support material. Overhangs can be overcome by printing the model at a different angle (so with a different side as the base), or where this is not possible, by activating support material. Larger (closer to horizontal) unsupported overhangs are possible as layer height reduces, as the thinner the layer height, the smaller the “step out” on each layer in relation to the nozzle diameter, allowing them to be more easily supported by the previous layer.

What are some tips for getting the best possible print?
Elsworthy: The best possible print will occur when a printer is fully calibrated and when a printer is on its highest quality setting. It’s important to print models that have actually been designed for 3D printing, taking advantage of the features of the technology (overhangs, hollow parts, undercuts, etc.) rather than trying to print a part that has been designed for a different production method (e.g., injection moulding). We expect this to improve with time, as model repositories online move toward “curated” libraries like MyMiniFactory where all models have been tested for “printability”– many other sites may contain objects, with invalid geometry and other problems making printing difficult or impossible.
About the Author
Jeff Kerns
Technology Editor
Voice Your Opinion!
To join the conversation, and become an exclusive member of Machine Design, create an account today!

Leaders relevant to this article: