Pulse Control Basics for Motion Control
Using pulse outputs from a PLC is a cost-effective way to get simple motion. Most, if not all, PLC manufacturers provide a way to control servos and steppers using a pulse train signal. So when a simple machine needs to be automated on only two or three axes on electric actuators, pulse outputs can be much easier to set up, wire, and program than using analog signals. It may also cost less than using networked motion such as Ethernet /IP.
So let’s take a look at controlling a stepper motor or servo with a driver or amplifier in between the controller and motor with the emphasis on the pulse signals used from the controller or indexer.
This article talks about controlling a basics motion control system, a stepper motor or servo with a driver or amplifier in between the controller and motor, using pulse signals.
Pulse Train Basics
Stepper motors and pulse-controlled versions of servo motors can rotate in both directions. This means a controller needs to provide, at a minimum, two control signals to the drive. There are two ways to provide these signals, and different manufacturers call them different things. There are two common ways to refer to the two control signal schemes you are using: “1P mode”, aka as “Step/Direction mode”, and “2P mode”, which is called “CW/CCW mode” or clockwise/counterclockwise mode. Both modes require two control signals from the controller to the drive.
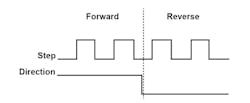
In 1P mode, one control signal is a pulse train or “step” signal. The other signal is a directional input. If the directional input is on, and a pulsed signal is present on the step input, the motor rotates clockwise. Conversely, if the direction signal is off and a pulsed signal is present on the step input, the motor rotates the other direction, or counterclockwise. The pulse train is always on the same input no matter what direction is desired.
These are examples of 1P signals for forward and reverse motion.
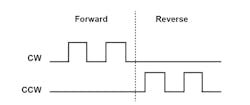
In 2P mode, both signals are a pulse train. Only one input at a time will have a frequency, so if the CW pulse train is present, the motor rotates CW. If the CCW pulse train is present, the motor rotates CCWs. Which input receives the pulse train depends on the desired direction.
These are example of 2P signals for forward and reverse motion.
Pulses output from the controller make the motor move. The motor rotates one incremental unit for every pulse on the drive’s pulse input. For example, if a two-phase stepping motor has 200 pulses per revolution (ppr), then one pulse makes the motor rotate 1/200 of a revolution or 1.8 deg., and 200 pulses will make the motor rotate one revolution.
Of course, different motors have different resolutions. Stepper motors can be micro-stepped, giving them many thousands of pulses per revolution. Additionally, servo motors generally have many thousands of pulses per revolution as their minimum resolution. No matter what the motor resolution, a pulse from the controller or indexer makes it rotate only one incremental unit.
The speed at which a motor rotates depends on the pulses’ frequency, or speed. The faster the pulses, the faster the motor turns. In the example above, with a motor that has 200 ppr, a frequency of 200 pulses per second (pps) would rotate the motor at one rotation per second (rps) or 60 rotations per minute (rpm). The more pulses needed to turn the motor one revolution (ppr), the faster the pulses must be sent to obtain the same speed. For example, a motor with 1,000 ppr would need to have the pulse frequency times as higher as that of a motor with 200 ppr to go the same rpm. The math is pretty simple:
rps = pps/ppr (rotations per second = pulses per second/pulses per rotation)
rpm = rps(60)
Controlling the Pulses
Most controllers have a method for determining if the motor should rotate CW or CCW and will control signals appropriately. In other words, it’s not normally required for the programmer to figure out which outputs to turn on. For instance, many PLCs have functions for controlling motion using a pulse signal, and that function automatically controls the outputs to obtain the correct direction of rotation regardless of whether the controller is configured for 1P or 2P mode.
Consider two moves as a simple example. Both moves are 1,000 pulses. One is in the positive direction, the other in the negative direction. The controller turns on the appropriate outputs, whether 1P or 2P is used, to make the motor rotate in the positive direction (usually CW) when the number of pulses commanded is 1,000. On the other hand, if a program commands −1,000 pulses, the controller turns on the appropriate outputs to move in the negative direction (usually CCW). Therefore, it’s not necessary for the programmer to control the direction of motor rotation by using code in the program to select which outputs to use. The controller does that automatically.
Controllers and drivers generally have a way for users to select pulse type, either by dip switch or software selection setting. It’s important to ensure the controller and driver are set up the same. If not, operation may be erratic or won’t work at all.
Absolute and Incremental Moves
The two most common movement commands in motion control programming are incremental and absolute move commands. The concept of absolute and incremental moves confuses many users regardless of the motor control method used. But this info applies whether the motor is controlled with pulses, an analog signal, or a network like Ethernet/IP or Ethercat.
First, if a motor has an encoder on it, its types of moves have nothing to do with the encoder type. Second, absolute and incremental moves can be done whether there is an absolute or incremental encoder or no encoder at all.
When using a motor to move a linear axis, such as a ball screw actuator, there is (obviously) a finite distance between one end of the actuator to the other. In other words, if the carriage is at one end of the actuator, the motor can only be rotated to move until the carriage reaches the opposite end. This is the stroke length. For example, on an actuator with 200-mm of travel, one end of the actuator is normally the “zero” or home position.
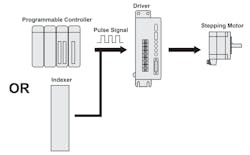
A PLC or other indexer outputting pulse train signals to a pulse train controlled drive.
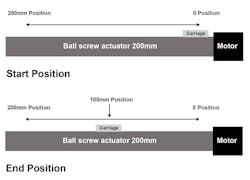
An absolute move transports the carriage to the commanded position regardless of its current position. For example, if the current position is zero and the commanded move is to 100 mm, the controller sends enough pulses to move the actuator forward to the 100-mm mark and stop.
On the left, a motor-driven actuator with the carriage is at the zero position. On the right, a motor-driven actuator with the carriage moved to the 100-mm position.
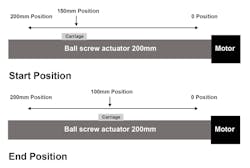
But if the actuator’s current position was 150 mm, an absolute move of 100 mm would make the controller send pulses in the negative direction to move the actuator backwards 50 mm and stop at the 100-mm position.
On the left, a motor-driven actuator moves the carriage to the 150-mm position .On the right, a motor-driven actuator moves the carriage to the 100-mm position.
Note that whether 1P or 2P mode is selected, the move commands work the same.
Practical Uses
The most common problem with using pulse control is in the wiring. The signals often get accidently wired in reverse. In 2P mode, this means the CCW output is connected to CW input and vice-versa. In 1P mode, it means the pulse signal output is wired to the direction input, and the direction signal output is connected to the pulse input.
In 2P mode, this wiring mistake makes the motor spin CW when commanded to go CCW and CCW when commanded to go CW. In 1P mode, the problem is more difficult to diagnose. If the signals are swapped, the controller sends a pulse train to the direction input, which does nothing. It would also send a direction change (turn the signal on or off depending on the direction) to the step input which may cause the motor to rotate a pulse. One pulse of movement is usually pretty hard to see.
Using 2P mode makes troubleshooting easier, and it is usually easier to understand for those without much experience in this type of motion control.
Here’s a method for ensuring as little time as possible is spent troubleshooting pulse and direction axes. It lets engineers focus on one thing at a time. This should prevent you from spending days trying to figure out what wiring mistake is preventing motion only to find out the pulse output function is incorrectly configured in the PLC and you were never outputting pulses.
1. Determine the pulse mode to be used and use the same mode for all axes.
2. Set the controller for the proper mode.
3. Set the drive for the proper mode.
4. Create the simplest program in your controller (usually a jog function) so the motor can be commanded to rotate in one direction or the other at a slow speed.
5. Command a CW movement and watch for any statuses in the controller to indicate pulses are being output.
--This could be LEDs on the outputs from the controller or status flags like the busy flag in the PLC. The pulse output counter in the controller can also be monitored to see it is changing value.
--The motor does not need to be connected to output pulses.
6. Repeat the test in the CCW direction.
7. If outputting pulses in both directions is successful, move on. If not, programming must be figured out first.
8. Wire the controller to the driver.
9. Jog motor in one direction. If it works, go step 10. If it doesn’t work, check the wiring.
10. Jog the motor in the opposite direction. If it works, you’ve succeeded. If it doesn’t work, check the wiring.
Many hours have been wasted at this first phase because the pulse frequency is low enough to make the motor spin extremely slowly, like 1/100 rps. If the only way you can tell if is operating is by watching the motor shaft, it might not look like it’s moving at a low speed, leading one to believe it’s not putting out pulses. It is best to calculate a safe speed based on motor resolution and application parameters before speed is set for the test. Some believe they can set a usable speed just by guessing. But if the motor needs 10,000 pulses to rotate one revolution, and the pulse frequency is set at 1,000 pps, the motor will take 10 sec. to move one revolution. Conversely, if the motor needs 1,000 pulses to move one revolution, and the pulse frequency is set to 1,000, the motor will move one revolution per second or 60 rpm. That may be too fast for the test if the motor is attached to a load like a ball screw actuator with limited motion distance. It is critical to watch indicators that reveals pulses are being output (LEDs, or pulse counter).
Calculations for Practical Application
Users often end up with HMIs showing the machine’s distance and speed in units of pulses rather than engineering units such as millimeters. Often the programmer is rushed to get the machine working and doesn’t take the time to determine the machine units and convert them to engineering units. Here are a few tips for helping with this.
If you know the motor’s step resolution (pulses per revolution) and the movement made per motor revolution (mm), the command pulse constant is calculated as resolution/distance per revolution, or pulses per revolution/distance per revolution.
The constant can help find how many pulses are needed to move a specific distance:
Current position (or distance) = pulse count/command pulses constant.
A motor driven ball screw system moves 10-mm per revolution.
To convert engineering units to pulses, first determine the constant that determines the number of pulses needed for a given move. Assume in the example above the motor requires 500 pulses to rotate one revolution and one revolution is 10 mm. Calculating the constant can be done by dividing 500 (ppr) by 10 (mm p/r). So the constant is 500 pulses/10 mm or 50 pulses/mm.
This constant can then be used to calculate the number of pulses needed for a move of a given distance. For example, to move 15 mm, 15 mm × 50 ppm = 750 pulses.
To convert a pulse counter reading into engineering units, simply divide the pulse counter value by the command pulse constant. Thus, if the pulse counter reads 6,000, divided it by the command pulse constant calculated from the example above, the actuator position would be 6,000 pulses/50 ppm = 120 mm.
To command a speed in mm and have the controller calculate the proper frequency in Hz (pulses per second), the speed constant must first be determined. This is done by finding the command pulse constant (as shown above), but the units are changed. In other words, if the motor puts out 500 ppr and the actuator moves 10 mm per revolution, then if 500 pulses per second are commanded, the actuator will move 10 mm per second. Dividing 500 pulses per second by 10 mm per second results in 50 pulses per second per mm. Therefore, multiplying the target speed by 50 results in the proper pulse frequency.
The formulas are the same, but the units change:
Speed constant in pps = pulses per revolution/distance per revolution
Pulse speed (pps) = (speed constant) × speed in mm
Using a setup that uses pulse train signals to control motion might seem daunting at first, however, paying close attention to signal types and settings on the controller and drives at the beginning can reduce the time spent making it work. In addition, if one takes the time to do some basic calculations right away, programming the speeds and distances will be easier and machine operators will have more intuitive information displayed on their HMIs.
Ray Marquiss is a senior application engineer for Valin Corp. For more information, please visit www.valin.com.
