Quality Control Processes Ensure Precision in Military Vehicles
When military vehicle manufacturers develop new tactical vehicle concepts, consistency and quality are crucial. Embedded technology is transforming military vehicles into data-packed and self-sufficient hubs of intelligence. But technology is also changing the way these vehicles are manufactured, enabling more efficient output of high-volume vehicle orders. Not only is the industry making a higher volume of military vehicles, but the quality of such vehicles is also improving, thanks to the latest quality control machinery.
That said, embedding high-end technology on top of poor hardware is the equivalent of giving a broken robot a top-of-the-range gripper. In the age of new technologies, vehicle designers need to build from the ground up. Using testing procedures, these manufacturers can ensure high-quality hardware as the starting point for their vehicles.
Shadowgraphs
One of the more traditional non-contact inspection systems is the shadowgraph. While the technology may have been around for a long time, this equipment has advanced: Digitalized and modern versions have improved accuracy on dimensions.
Image dimension measurement devices are designed to help drastically reduce inspection times compared to conventional shadowgraphs. Up to 100 simultaneous measurements can be performed in seconds on a wide range of precision parts to a repeatability of ±0.1 microns. Built-in data management and programming interfaces enable the creation of custom inspection reports and measurement data quickly and easily.
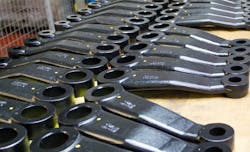
The drop arms pictured above are an essential part of a vehicles steering mechanism.
TESA-SCAN
The TESA-SCAN is a Swiss-made metrological machine. It is used to check the dimensions of turned parts, replacing the use of conventional manual inspection equipment such as calipers or micrometers.
The TESA-SCAN incorporates high-resolution CCD linear sensors that combine lines of thousands of pixels. As the part profile is projected, these sensors, which are capable of detecting the slightest changes at the pixel level, act as a light-sensitive measuring device.
The operator can simply place a standardized part into the machine, and the machine will automatically measure the part geometry against pre-determined specifications and tolerances. By having the machinery to quickly and precisely check parts against the specified dimensions, parts can be made to very tight tolerances and kept under control with an in-process inspection.
Coordinate Measuring Machine
A coordinate measuring machine (CMM) is a device that measures the geometry of physical objects. The CMM works by sensing discrete points on the surface of the object with a probe. These probes can vary in types, such as mechanical, optical, laser, and white light.
Older CMM machines use manually controlled probes, whereas new technology, like the kind used at Pailton Engineering to measure its steering system parts, uses computer-controlled probes.
FARO Arm
The FaroArm is similar to the CMM but is a portable coordinate measuring machine (PCMM). Whereas traditional CMMs use a probe that moves on three Cartesian axes to measure 3D geometry, PCMMs use articulated arms to enable complete freedom of movement around a test part. This gives more measuring flexibility for complex parts, where three axes of movement may not be sufficient.
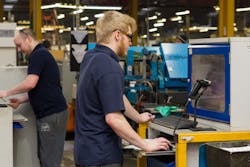
Engineers at Pailton Engineering use equipment like the coordinate measuring machine and TESA-SCAN for quality control.
Brinell Hardness Machine
While the previous machines have focused on dimensional consistency, there are other characteristics that must be standardized to ensure quality control. This includes how hard the material of a part is.
Hardness is a characteristic of a material defined as the resistance to indentation. This is determined by measuring the diameter of an indentation after a fixed force is applied. The smaller the indentation, the harder the material.
The Brinell hardness machine allows engineers to check that all parts in each batch are of the correct hardness. Brinell test machines use a very high-test load of around 3,000 kg and a 10 mm diameter indenter so that the resulting indentation averages out the most surface and sub-surface inconsistencies.
These are five ways of ensuring military vehicle steering parts are made to very tight tolerances. While some techniques use light, such as the shadowgraph, others use physical force as seen with the Brinell hardness test. These testing techniques enable the best military vehicles to be brought to market, meaning the latest embedded technology is built on high quality, consistent hardware.
Lee Dixon is a quality manager at Pailton Engineering, a military steering system supplier.


